I’ve always been fascinated by the sheer complexity hidden inside a modern car. My time working with tier 1 automotive suppliers only deepened that curiosity. I saw how a single vehicle operates as a network of dozens of mini-computers (ECUs), all communicating flawlessly.
But how?
How does the application logic (like a seatbelt warning) get data from a physical sensor? How does it “talk” to the warning light in the dashboard?
I wasn’t satisfied with just knowing the high-level theory. I wanted to build it.
To answer these questions for myself, I embarked on a side quest: to build a “virtual car” from the ground up, one layer of the automotive software stack at a time. This post covers that journey, from the first line of code to a functioning system.
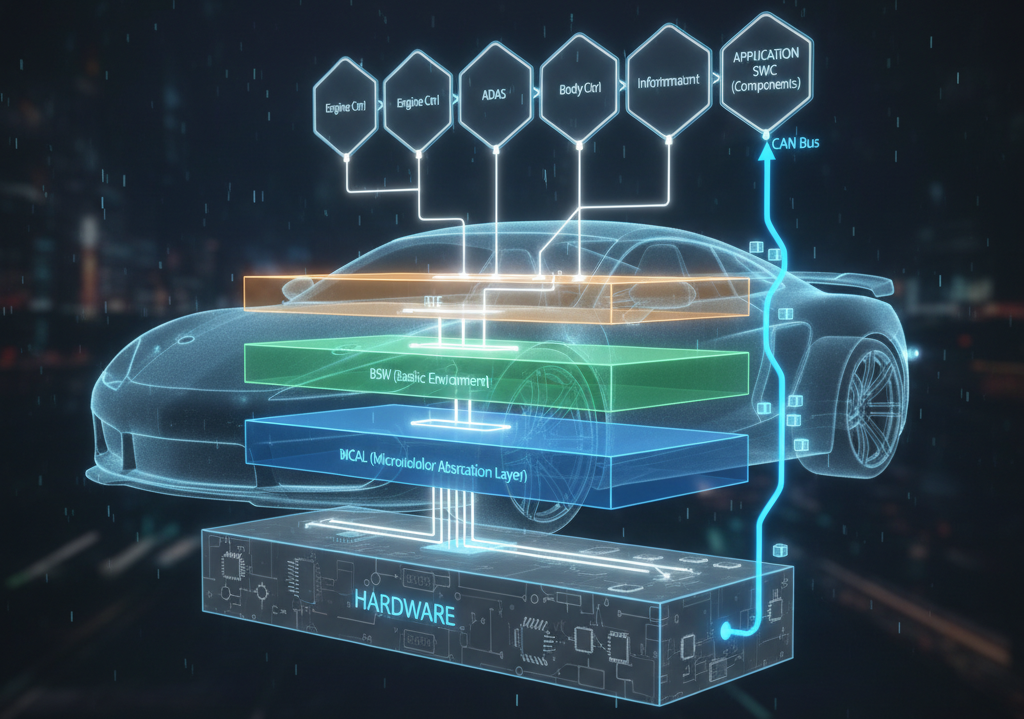
1. The Foundation: Simulating the MCAL
My journey started at the very bottom: the hardware. How does software talk to the “metal”?
- Problem: You can’t control hardware directly from high-level code, you need a layer that translates commands into register-level operations
- Action: I built a virtual low-level driver in C to simulate the MCAL (Microcontroller Abstraction Layer). This is the software layer that directly controls the hardware registers. I designed a “virtual” SPI peripheral with its own control, status, and data registers. My C code then used bitwise operations to configure and interact with these simulated registers.
- Result: I created a clean, reusable API with two functions:
Spi_Init()andSpi_ReadWriteByte(). Any “application” could now just call these functions without ever needing to know the complex register addresses or bitmasks.

- Learning: This project clarified the why behind hardware abstraction. The MCAL’s job is to create a “black box” that hides the messy, specific details of the hardware, providing a simple, standard interface to the layers above it.
2. The Nervous System: Simulating the CAN Bus
With a single “component” sorted, my next question was how to get it to talk to other components, just like in a real car.
- Problem: A car’s ECUs (like the Engine and Dashboard) are physically separate. They need a robust network to exchange data.
- Action: I built a simulator for the CAN (Controller Area Network) bus, the vehicle’s internal nervous system. I used Python and UDP sockets to mimic the broadcast-style nature of CAN. I created two separate scripts:
engine_ecu.py: A “producer” that faked RPM and speed data.dashboard_ecu.py: A “consumer” that listened for that data.
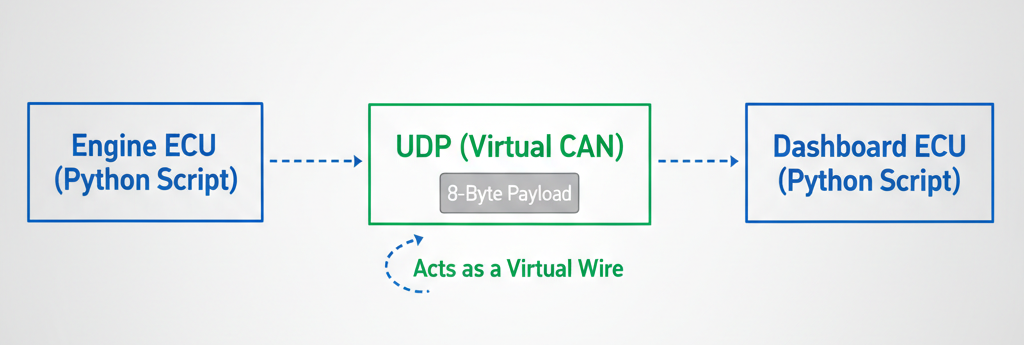
- Result: The simulation successfully mimicked real-time communication between ECUs. The engine module generated CAN-formatted byte payloads, which the dashboard module decoded to display RPM and speed.
- Learning: This taught me the core principles of in-vehicle networking. I had to design a message format, handle the (de)serialization of data into bytes, and manage a “producer-consumer” relationship, all of which are central to how real ECUs communicate.
3. The Application: Building an AUTOSAR SWC
I had hardware drivers (MCAL) and a network (CAN). Now, how do I write the actual application logic in a way that’s standardized, reusable, and testable?
- Problem: Application code (like a “seatbelt reminder”) shouldn’t care if its data comes from a direct sensor or a CAN message. It just needs to run its logic.
- Action: I dived into AUTOSAR (AUTomotive Open System ARchitecture), the industry-standard blueprint for this. I built a virtual SWC (Software Component) in C for a seatbelt reminder.
- Result: I created a self-contained “black box” of logic with clearly defined ports (like
R_VehicleSpeedandP_WarningLight). To test it, I also built a “stubbed” RTE (Run-Time Environment), which fed my component fake data, similar to how a real car would. This allowed me to create a test harness (main.c) that ran my component through various scenarios (e.g., “ECU asleep,” “sensor fault,” “speed OK”).
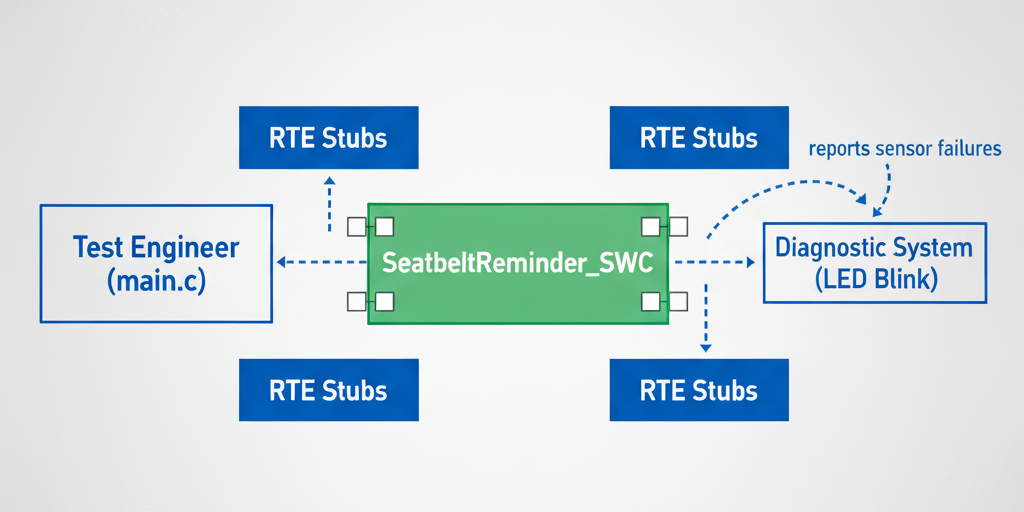
- Learning: This gave the final insights. AUTOSAR provides the final, highest layer of abstraction. My SWC is completely decoupled from everything. It doesn’t know about MCAL or CAN. It just reads from its “ports” via the RTE. This is what makes automotive software so robust, testable, and reusable across different cars and hardware.
My “Virtual Car” Stack & Repositories
This bottom-up approach was an incredible learning experience. Each project built directly on the last, giving me a holistic view of how these complex systems are built.
- Layer 1 (MCAL): MCAL Driver Simulation (GitHub)
- Layer 2 (CAN): Python CAN Bus Simulator (GitHub)
- Layer 3 (AUTOSAR): Virtual AUTOSAR SWC (GitHub)